How to Install a Pool Liner
In this article we’ll go over how to install a replacement above ground pool liner for your pool.
Preparing Your Pool Site
To make sure your new liner fits well and looks great, you must prepare the pool before starting to fit the liner.
Make sure you have a good sand base. A suitable poison should be used liberally over the entire area to kill all the grass where your liner will be fitted.
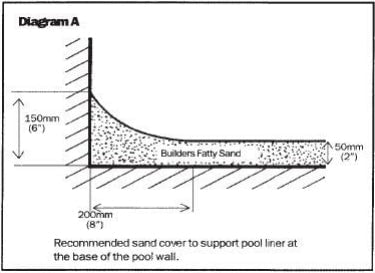
The sand base should be 50mm (2″) deep over the entire floor of the pool, then it should form a cove all the way around the wall of the pool area at least 150mm (6″) high (see diagram A). This cove prevents the liner from being forced out underneath the wall of the pool and causing damage.
Step 1
Smooth and spread the sand using the back of a garden rake or you can use a 1500mm (5′) piece of timber as a screed. You may also find the sand easier to work with if it’s damp.
When the sand floor in the pool is completely smooth, compact it by tamping or rolling. Finally, you can use a fine broom to remove any compaction marks and give a good smooth finish.
Step 2
Clean down the walls of the pool to ensure that any sand and metal filings etc are removed, to prevent any damage to your liner. It is important to then tape (PVC insulation tape is suitable) over the wall join bolts on the inside wall of the pool. To obtain maximum life from your new liner, a ground sheet e.g. black plastic, should be placed over the sand before placing the liner in position. This can be taped to secure it to the pool wall above the sand cove for ease of fitting.
Remove the top copings from the pool (if applicable to your pool, most smaller pools have a small round metal capping that should not be removed). Also tape over any sharp edges of the metal capping before the liner is fitted.
Fitting Your New Pool Liner…
Step 1
Before unpacking your new liner, make sure it is the correct size as per the label as it cannot be returned once removed from the carton. Do not use any type of knife or sharp object to open the carton.
With one or more people inside the pool, pass the liner into the pool and place it adjacent to one end (in the shallow or narrow end if applicable to your pool).
Take care when handling the liner as sharp objects, even shoes, may damage it.
Step 2
Unroll the liner toward the other end of the pool and gently open it our making sure you do not disturb the level of the sand.
The shiny side of the liner is the back which is placed against the sand, while the embossed side will hold the water.
Spread the liner so that the wall-to-floor seam lies evenly (about midway) on the coving around the edge of the pool.
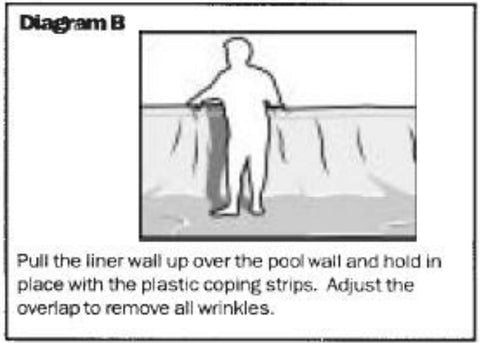
Place the top edge of the liner over the wall of the pool by about 150mm (6″) starting at each end first then at either side (see diagram B).
You may need clothes pegs at this stage to hold the liner in place. On some pools the liner may appear too small in the perimeter. This can be adjusted by evenly tensioning the perimeter of the liner as you place the top edge over the wall of the pool.
Check that there are no diagonal wrinkles in the wall of the liner as these indicate either an uneven overlap or the wall is not square with the bottom. This can be easily adjusted by moving the top of the liner in either a clockwise or anticlockwise direction until all wrinkles disappear. Now check that the seams on the floor of the liner are running straight and that the base of the liner is flat with all the large wrinkles removed.
Step 3
There are 2 methods of removing the remaining wrinkles in the liner – the hand method or the vacuum method.
Choose a method and follow the instructions below. N.B. If the pool has a deep end, you must use the vacuum method.
Hand Method
Place a garden hose in the pool and be sure to remove any fittings that could damage the liner.
The person fitting the liner should get into the pool just prior to fitting, as the liner can be slippery when it has a small layer of water on it.
Start filling the pool until you have 25mm (1″) of water over the entire floor, now turn the hose off.
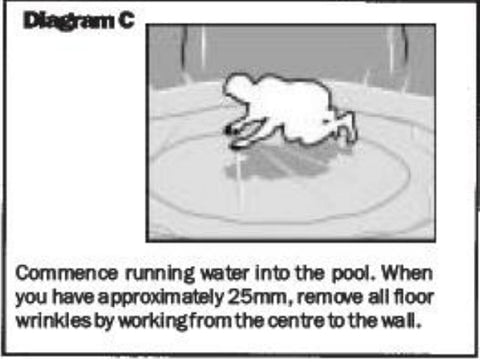
Work out all the wrinkles in the floor by starting in the centre of the pool on your hands and knees (see diagram C).
Gently push the wrinkles out in a circular motion, gradually moving all the surplus liner material to the edges of the pool.
IMPORTANT: If there is any more than 50mm (2″) of water on the liner, it will be almost impossible to move any wrinkles and persistence may cause damage to your new liner.
Once you are happy that there are no wrinkles on the floor, adjust any surplus liner material over the edge of the pool and continue filling the pool until the water is 150mm (6″) deep (or until it is 50mm (2″) above the cove). Remove the slack from the wall of the liner, section by section.
The wall of the liner should not have any horizontal or diagonal wrinkles in it. DO NOT OVER-TENSION THE LINER. Liners are designed to fit snug without any excess tension.
Secure the liner with the coping sections and continue to fill the pool to 300mm (12″) deep. At this stage you need to check the tension of the liner around the perimeter of the pool and if necessary remove the sections of the coping near the affected area and release the tension. Now proceed to the “Connecting the Filter” section.
Vacuum Method (must be used for pools with deep ends)
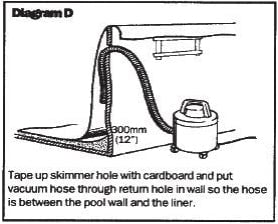
Tape over the skimmer opening with a suitably sized piece of cardboard and masking tape.
Place the hose of a vacuum cleaner (a Wet & Dry type is preferable) through the return hole in the wall of the pool until it is 300mm (12″) above the sand.
Tape around the hose at the wall to make it seal (see diagram D).
Double check that the liner has no large wrinkles or surplus material and make sure it is secured by the plastic strips.
IF THE POOL IS A DEEP END OR THE LINER APPEARS TO BE TIGHT. PLACE THE TOP RAILS ON THE POOL BEFORE SWITCHING ON THE VACUUM CLEANER.
When the vacuum is turned on, you’ll see the liner start to suck down to the walls. As it sucks down, continually work the wrinkles out toward to edge of the pool. You may have to switch the vacuum off to adjust the tension of the liner a couple of times. This is quite normal.
Once you have the liner vacuumed out and ALL the wrinkles removed, start filling the pool with your garden hose. Make sure any fittings on the hose are removed or protected so they do not damage the liner. LEAVE THE VACUUM CLEANER RUNNING UNTIL THE POOL IS 300mm (12′) DEEP. Now you can turn the vacuum off. Carefully remove the vacuum hose from the wall of the pool, making sure you get all the tape off and do not allow any to fall in behind the liner. Remove the cardboard from the skimmer with the same care also.
Connecting the filter….
It is now time to connect your filtration system through your new liner, and again it is important that there is at least 300mm (12″) of water over the floor of the pool. You can fill the pool to within 150mm (6″) below the filtration openings.
Step 1
As per your manufacturer’s instructions, fit the skimmer box onto the wall of the pool by placing one gasket on the outside of the wall and the other between the liner and the escutcheon plate (plastic face plate).
It is advisable to use a clear silicone sealant on all faces for a positive sealing.
Step 2
Secure the escutcheon plate in place with the screws provided with the skimmer box and when fully secured, neatly and carefully trim the liner material from the skimmer opening with a sharp knife.
Step 3
To fit the pool return, cut a hole in the liner 10mm (3/8″) smaller than the hole in the wall of the pool. Fit the return fitting through the wall using a gasket or silicone sealant on each side of the wall.
Tighten the fitting firmly to ensure there are no leaks.
Step 4
Connect the rest of the filtration (if required) then fill your pool to the desired operating level, usually half way up the skimmer opening. Now, chemically balance your water before using the pool.
HAPPY SWIMMING!
